Especially in a building game, many values have to be calculated – e.g. number of inhabitants, inhabitants at work, sick inhabitants etc. Since these values often influence each other, the result is an extremely complex set of variables that are almost impossible to control. But how do you monitor them to see which calculation is wrong?
In the following I would like to introduce you to two, in my opinion, very efficient ways: The Debug.Log() function and creating a DebugWindow.
Debug.Log()
In the console window we can send messages to each other as developers. Here are four examples:
void Start()
{
   Debug.Log("First Message");
   Debug.Log("<color=red>Error: Second Message");
   Debug.LogError("Third Message");
   Debug.LogWarning("Fourth Message");
}
In our console window we will then see the following:
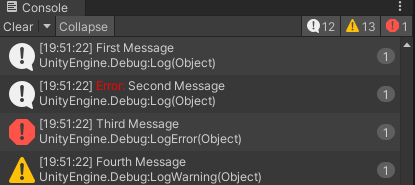
If you click on “Collapse”, the (exact) same messages are displayed only once and the number on the right changes:

If you overdo it with this function, the messages will be perceived as spam. But this console window has a huge advantage. If you double-click on the message, you end up exactly where the message was produced. This is exactly why I love this feature so much.
Beware: Debug.Log() is extremely resource intensive. It will greatly affect the frame rate. Therefore I recommend to use this function only situationally and not in the Update() function.
Debug Window
The fact that you can create your own windows in Unity seems a bit confusing for any newbie. However, creating your own window
In this own window thousands of values can be monitored and it is very simple.
Step 1
Create any CS script in your Unity project.
Step 2
Customize the script. Explanation follows.
using UnityEngine;
using UnityEditor;

#if UNITY_EDITOR
public class Logger_MainVariables : EditorWindow
{
    [MenuItem("Window/Logger_MainVariables")]
    public static void ShowWindow()
    {
        EditorWindow.GetWindow("Logging Tool für Alle Variablen");
    }

#endif
a. See that both using commands are inserted exactly like this at the beginning.
using UnityEngine;
using UnityEditor;
b. Everything between these lines of code is only needed in the UnityEditor. In the finished game, this function is then ignored:
#if UNITY_EDITOR
//...
#endif
c. Adjust MonoBehaviour:
public class Logger_MainVariables : EditorWindow
{
//...
}
In this example my script is called: “Logger_MainVariables.cs” Do not change the name at this point of your script, just change the text “MonoBehaviour” to “EditorWindow”.
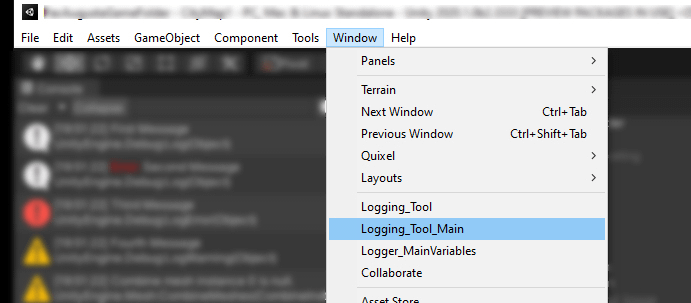
d. Let’s give the window a name:
[MenuItem("Window/Logger_MainVariables")]
Thanks to this line of code, your window is now available in the Unity menu. Namely here:
e. Now we create the function ShowWindow() and give the window a title:
public static void ShowWindow()
    {
        EditorWindow.GetWindow("Logging Tool für Alle Variablen");
At this point, everything would be prepared. Quite simple, actually. Now we can insert values.
We can display a very simple value like this:
GUILayout.Label("Hallo Welt");But this does not make much sense. Therefore, we can also add variables to this. Let’s say we have a “public static int money = 99;”, then we could display it like this:
GUILayout.Label("Money: " + money);If you want to display a lot of values, then it makes sense that you group these values together and then organize them using a CollapsElement. This is very easy and worthwhile:
private bool bereich_a = false;
private bool bereich_b = false;

bereich_a= EditorGUILayout.Foldout(bereich_a, "Das ist der Bereich A");
        if (bereich_a)
        {
            GUILayout.Label("tText Eins");
            GUILayout.Label("tText Zwei");
            GUILayout.Space(10);
        }

bereich_b= EditorGUILayout.Foldout(bereich_b, "Das ist der Bereich B");
        if (bereich_a)
        {
            GUILayout.Label("tText Drei");
            GUILayout.Label("tText Vier");
            GUILayout.Space(10);
        }
One could supplement the whole still by colored texts. I did this with me, if a value reaches a state, which it should not actually reach:
if (money < 0)
{
     GUI.color = Color.red;
}
GUILayout.Label("tKein Geld mehr");
GUI.color = Color.white;
I first took the color red, then I set everything back to white.
Visual representation of values
Partly it would be interesting to see how certain values change – e.g. at which point the population decreases and especially how much. Brackeys – who doesn’t know them 😉 – have shown in a great video in which they present 100 Unity tricks in point 54 a way how to display values visually. [Click here for link].
public AnimationCurve paintIt = new AnimationCurve();

float value = 1;

void Update()
{
    paintIt.AddKey(Time.realtimeSinceStartup, value)
}
If you now insert this code and fill the variable “value” with values, then an AnimationCurve is displayed in the Inspector, which you can enlarge with a left click. A very practical method, thanks Brackeys (RIP) 🙂